 Dona Room is a further mad POINT and clicks to Adventures in styles escape the Room Games. As always useful articles must be looked for and used around a way to find Dona´s Room to leave. This play will bind you surely some time - I am strained whether it someone create all mysteries to solve. Much fun!
Click here to play


1 comments:
Walkthrough:
1) Look at the dart board. Notice the order of the numbers 9 - 12 - 5 - 20 - 1. Take the darts (or leave them, they are not important)
2) Look at the bed. Look behind the headpiece of the bed to get a clue (THIS MUST BE DONE OR THE SAFE WILL NOT OPEN). The clue is the ordering of the numbers on the wall behind the bed correspond to the ones on the dartboard. The filled in square then equals to '5'
3) While looking at the numbers on the wall you can see a flat brown thing on the right side of the bed. It´s a penny. Pick it up.
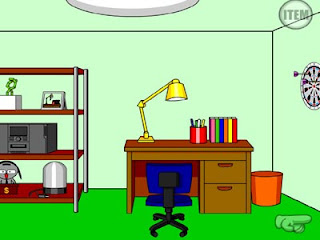
4) Turn to look at the bookcase from the side. Pick up the small silver key behind the stereo. You need to hit it exactly with the mouse or your view will just change to a full frontal view of the bookcase. You may need several tries to hit the exact position. Just keep trying.
3) Look at the bookcase. Pick up the photo. Look at it. Note the color sequence of the books.
4) Zoom in on the lamp on the lowermost shelf. Drag the penny to the screws, click the glass and then pick up the bulb.
5) Look at the desk and zoom in. You may pick up a pen. It is not necessary. Drag the bulb on the lamp. open the top drawer (long drawer above the two locked ones). Get cassette.
6) Unlock the drawer with the silver lock using the silver key. Pick up tweezers.
7) Organize the books in the order of colors, just like they appear on the photo. You´ll be able to read "circle is two" if you read the indicated lines on the photograph. (THIS MUST BE DONE OR THE SAFE WILL NOT OPEN).
8) Zoom out. Click on the trash can. Pick up piece of paper. Look at it. (THIS MUST BE DONE OR THE SAFE WILL NOT OPEN). The empty triangle equals '4'
9) Go back to the bookcase and look at the little piggy bank on the lower most shelf. Use tweezers to get the golden key stuck in the slot.
10) Go back to the desk. Use the golden key in the golden lock and pick up the knife.
11) Turn to the bed and look under it. Pick up the blue book.
12) Zoom back out and click on the poster. You may drag the darts on the nostrils and the pen on the poster if you like to make it a little more appealing, but this is not necessary. Use the knife to cut the poster loose and reveal the safe.
13) Turn off the lights with the switch by the door and go to the desk. Now look at the lighted spot. (THIS MUST BE DONE OR THE SAFE WILL NOT OPEN). Jot down the equations.
14) While looking at the equations take a look at the photo book to get another equation. (THIS MUST BE DONE OR THE SAFE WILL NOT OPEN). Turn the lights back on.
15) Go to the bookcase and click on the top shelf where you will find a drawing. Put the casette on top of the drawing. (THIS MUST BE DONE OR THE SAFE WILL NOT OPEN). This will reveal the empty star to be equal to the number '3'.
16) You should now be able to do the math and solve for the symbols on the safe.
(The combination is 718)
17) Enter the code in the safe and use the handle. Read the note. Exit the room
Post a Comment